Showing posts with label Sewing. Show all posts

Friday, October 7, 2011

Halloween Rag Quilt

I finally finished my Halloween Rag Quilt, Yippee!
My kids have loved it so much.
They just lay it out like a 'carpet' and sit and lay all over it.

I layed out my fabric how I wanted it to be when it was done.

I sewed the squares together in rows. Then the rows together, with a 1/2 inch seam.

 Here's the long and tedious part... start cutting notches, about a 1/2 inch'ish, around every seem. Don't cut into the thread.


Then put it in the wash (cold water, no soap) then put it in the dryer to get it to fray!

 Like my cute bat pillow! It's from Ameroonie's shop.

Just in time for the snow that started flying today.
Happy Warm Halloween!


Now, Don't forget to go and enter the 4 Giveaways going on right now:

Cut It Out - Five 4x6 frames

 Giveaways end Monday


Friday, August 5, 2011

Rag Quilts

A rag quilt is a patch work quilt with the edges exposed on the outside of the quilt. 
They fray up and look super cute!
Here's some cute ones I found to show what the technique looks like.


 I bought fabric a couple weeks ago to make a rag quilt and I have started working on it.
It's Halloween colors/theme. I wanted to make sure it was done so I could use it for the whole month of October and not just the last week during Halloween.

Has anyone ever made a rag quilt? Got any tips? I would love to see some pictures if you have them!


Thursday, March 17, 2011

Aesthetic Nest

I have such a admiration for people that can do sewing and crocheting and knitting. 
It must be because I can't do ANY of those things.

I found this website, Aesthetic Nest, and I swear I just sat and read through every post and loved every project she posted. Her pictures are great and her children are adorable. That is a very good combination.

Look at some of the fun things she has done:

 Look at this darling bedroom for her little girl...there are more pictures on her site. I love the colors.

 Precious...I wished I had these when my daughters got blessed...maybe for the next child.


 You have gotta go check out the posts about this Farm Birthday Party...Her daughter had a cordinating dress to match and all the stuff was so cute and put together.


This blanket is my favorite...So much so, that I'm actually going to attempt to make one. Wish me luck!

I just love that I found her site and I hope you love it as much as I do to. Go check out all her other things. Plus, she has an etsy shop where she sells her patterns to make these darling things.

Monday, March 7, 2011

Scripture Cover

When I saw this Scripture Cover over at Delia Creates I fell in love with it. 1) because it is not like all the other boring covers out there made with industrial fabric or made from the 80's with all the quilting frilly'ness. 2) because Gery and Yellow I LOVE right now! I think it is so beautiful! Nice Job Delia!

She has the full tutorial over at her blog! Check it out...I love her blog!

Friday, March 4, 2011

Library Tote

The Girl Creative sewed this Library Tote bag, she makes it look SO easy. 

These would make awesome baby gifts with a book inside too!

And isn't that fabric to DIE for! I absolutely love that peacock fabric.

Tuesday, February 22, 2011

Crib Toy/Book Holder


My 2 year olds crib has at least 4 'babies' in it at all times, a binkie, at least 1 sippy cup, and at least 4 or 5 books. Not to mention a pillow and several blankets... Then add an almost 3 year old into the mix and it becomes fairly crowded in there. I need TWO of these things for her crib and I would be in good shape.

Craftiness Is Not Optional has the Full Tutorial to show you all how to make this beauty!

Monday, February 21, 2011

Fabric iPhone Case

Not JUST A House Wife has a super cute tutorial for a fabric iPhone case. I would love to make one of these.

Great sewing project to add to the list.


Friday, January 21, 2011

Gathered Heart Pillow

As you can see V and Co made this Heart Pillow but I love the fun little gather in the middle. I also really like the Ruffle Pillow behind it too.
I wished I had time to just sew all the cute pillow's I find on blogs!

Wednesday, January 12, 2011

Hem Jeans?? Can you do that??

This information would have been helpful 29 YEARS ago!!


I once bought a pair of expensive jeans from one of those jean parties (kinda like pampered chef) and the "host"was a seamstress too. Well, because I'm 5'3" I am just ultra short and I wanted to buy a pair of jeans but they were just so long. So the host said she would hem them for me, I just kind of stared at her like she was an alien!

"You can't do that?!" I'm thinking, "You will take off all the pretty stitching and then you will ruin a perfectly good pair of jeans and then I will never wear them again."

Well she explained how she does it and showed me her pants that had been hemmed. Amazing!! I can't believe I have never seen it before!

I love this tutorial because now I can do it myself (I asked the woman if she would do others for me, I would obviously pay her for it and she said "No"!)

So Here is Crap I've Made's tutorial!


You would NEVER be able to tell!

Tuesday, November 30, 2010

Very-Little-Sewing Felt Circle Pillow

Isn't this Pillow so cute for Christmas?! It's virtually no sewing. The Someday Crafts blog has the tutorial over there to follow this little beauty to perfection.
See, you don't have to sew those felt circles on...Just a little Elmers!
I think this one I might have to try to do.

Wednesday, October 27, 2010

TrIcK-oR-tReAt Totes!

My 2 year old is finally old enough to go trick or treating and understand the concept. Last year we had to knock on the doors hold her bag for her and hold her. This year she can do all that herself and understand that candy is involved! I think these tote bags are way cute and want to make one for her to have with her costume! Found this on The Sometimes Crafter.

Trick-or-Treat-Bag-Main-Photo

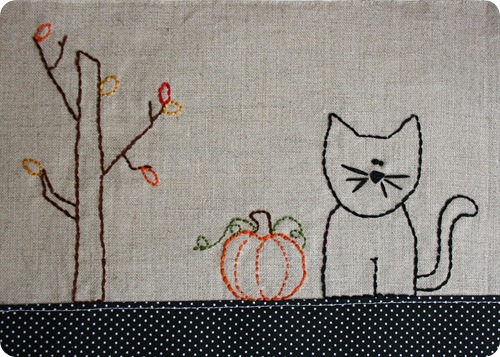
I wanted to have a little bag for Brice for Trick or Treating this year, and I knew I wanted to make it myself. I also knew that I wanted to do something with a pumpkin on linen so I combined the two. I’m not sure when I decided I wanted to do some embroidery, but I started sketching things out and came up with the above design. It’s absolutely fitting as Brice LOVES his “meows”.

IMG_4718

I stared with the cat and added the pumpkin, but kept thinking it needed something else. Hence the tree. But it was no easy matter trying to draw a tree that said “fall” but was still fun and cartoonish like the cat and pumpkin. With my moms advice I finally decided on the tree in the design.

IMG_4877

I found the dots at Joann’s along with the lining fabric some months back. I had thoughts of making them into a trick or treat bag for Brice, but this wasn’t what I was originally thinking, but that’s just fine by me.

IMG_4824

I have had the idea of doing a pumpkin appliqué on a bag since my apple bags. I made it up as I went along, using the sketch from my embroidery for my pattern. As an after thought I decided to embroider on the pumpkin, but knew embroidery for the vine was a perfect choice all along.

IMG_4750

He loves this little bag. He gave it a kiss and a hug and happily caries it around on his arm. It’s just the perfect size for treats and will serve us for many years. Not into Trick or Treating? I think it’s the perfect size for a little library tote, too. Now it’s time to go make one for yourself. The free pattern includes instructions for making the bag as well as the embroidery design and pumpkin appliqué template.

Treat or Treat Tote Pattern (PDF)

Tuesday, October 26, 2010

Halloween Table Runner

If I was a sewing kind of girl, which I am going to become because I'm taking sewing classes, I would totally make this for Halloween and all other holidays! I saw this great tutorial on 7Layer Studio


Ribbon Table Runner Tutorial

Runner with 1 ph2 redone


Runner with 1ph4 redone
Due to a large number of requests for an actual tutorial for the Halloween table runner I made last year, I'm doing just that. Yes, you're welcome. :-) Thanks for all your enthusiasm about this project - it has really appealed to a lot of people! It's not a difficult project, but I won't say it's a quick one. Despite its simple appearance, you will need to budget 2 to 4 hours for completion, depending on your experience level.

Strips cut

YOU WILL NEED:

2 yards fabric for main background color (relatively solid color is best)

2/3 yard fabric for border

approx. 12 yards ribbon; assorted sizes, colors, and designs

1/4" double-sided fusible interfacing (approx. 12 yards), such as Steam-A-Seam

Step 1) Cut main fabric into long rectangle measuring 14" x 70". Hint: cut the selvedge edge off one side (the entire length of fabric), then measure 14" from that edge. Make a small 1/2" snip at 14" mark with scissors, then rip fabric all the way down. It will follow the grain of the the fabric and you will rip a long strip 14" all the way down.

To cut border fabric, fold with selvedges together and use a rotary cutting system. Cut 5 strips which are 4" wide each.

Ribbons cut

Step 2) Precut your ribbon. Cut at least 4 of each variety if you're using 6 different ribbons, and more if you're using fewer different kinds. Cut the ribbon at least 16" long, because the length increases when ribbon is placed at an angle. If you want steeply angled ribbon, cut it 18".

NOTE: if your ribbon has stitched thread details, "preshrink" it with a hot steam iron. It will shrink considerably and will pucker your project if you don't preshrink it.

Fusible tape

Step 3) Place main fabric face up on ironing board. Arrange strips of interfacing in random fashion on fabric. Don't take off paper backing yet! Touch a hot iron VERY briefly (as in 1 second) to the paper-backed interfacing to fuse the first side a little, then peel off paper.

NOTE: At this point, don't overlap lines. Do the first layer, lay the ribbon down, then lay down a second series of interfacing + ribbon on top after completing Step 4.

Ribbon fused

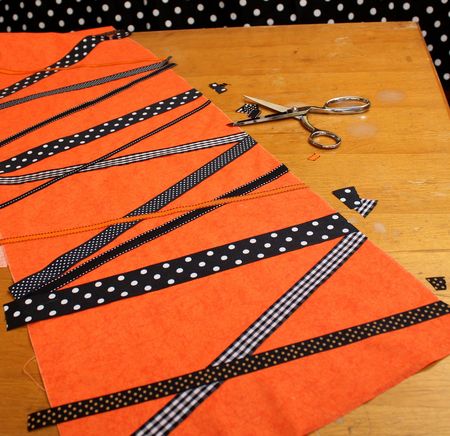
Step 4) Arrange ribbon on top of interfacing in desired sequence. Fuse in place according to manufacturer's directions. The super wide ribbon needs 2 strips of interfacing. I like to tuck the second strip of interfacing under and fuse it after doing the first one so that the ribbon doesn't shift. HINT: Don't scoot your iron along ribbon with painted designs on it - the paint could smear under high heat and a wiggly iron.

Repeat steps 3 and 4 if you want overlapping ribbon, such as the orange ribbon and a few of the black ribbons you see in photo below.
Snip off extra ribbon

Step 5) When all the ribbon is fused as desired, snip off excess ribbon along edges.

Sashes sewn and pressed

Step 6) Prepare the border fabric by stitching 2 strips together at the ends with a 1/4" seam, then pressing strip in half lengthwise with the right sides facing out. Repeat with 2 other strips. The 5th strip just needs to be pressed in same manner but not sewn to anything.

NOTE: There are other ways to sew the border on, such as sewing all the strips together and sewing it all the way around the rectangle with folded "miter" corners, but I didn't use that method in this tutorial. Those of you who know other methods of bordering are (obviously) more than welcome to attach border with alternate approaches.

Pin sash on

Step 7) Pin the 2 long strips to the 2 long edges of rectangle, with the raw edges of border facing outward to meet up with the raw edges of rectangle. You don't have to extend the border fabric beyond the edge of the rectangle as much as the photo shows: I was originally going to do standard miter corners but then changed my mind. Sorry if that confuses you. The ends should extend about 1/4" beyond rectangle for this method of sewing the borders on, not the 4" extensions I have pictured.

Sashes sewn on

Step 8) Using 1/4" seam, stitch long strips to the 2 long edges of rectangle. Serge if desired. Press borders out and press the seams toward center of rectangle.

End sashes cut

Step 9) Clip off extra border fabric on ends of rectangle. Take the 5th border strip and cut it into 2 equal lengths, as shown above.

End sash pinned

Step 10) With raw edge facing outward to meet up with raw edge of rectangle, pin end borders onto ends of rectangle. Center so that equal amounts of extra fabric extend beyond each edge.

Corner folded2

Step 11) Stitch/serge end borders on. Press seams AWAY from rectangle, so they face border. Press extra fabric "tab" over the end border on the backside so that all excess is folded under, as shown in photo below.

Corner folded

Corner tab diagonal

Step 12) Open tab temporarily and press the corner down as shown in photo above. Use a bit of interfacing tape and secure flap.

Corner tab diagonal fused

Step 13) Place 2 more bits of interfacing on open tab as shown. Remove paper backing.

Corner tab finished

Step 14) Fold flap over and fuse well. Repeat on other 3 corners. Give your runner one final pressing and go give some striking bling to your table!

Runner with 1ph3 redone

Related Posts Plugin for WordPress, Blogger...