Sunday, October 31, 2010

Mud Room

When my husband and I make a million dollars and buy/build another house one day we have both talked about having a "mud room." It's so funny that whenever we go and look at model homes we always stop and "ohh" and "ahh" over the mudrooms and laundry rooms. I get giddy thinking about having a spot one day to put the daily clutter that comes in the house every time I walk through the door: Jackets, shoes, diaper bags, hubby's things that come home from work and sit on my counter, hats, gloves and winter items, etc.

My ideal mud room would have a long wall with locker type thing for each person to put their belongings with a long bench for seating. A full bathroom would be nice, for those dirty kids that come in and need to be hosed off before they set foot anywhere else. A laundry room either part of it but ideally just attached in a separate room (this room would be huge and amazing too). I have seen in parade of homes that drinking fountains can be installed, but I would want one that is esthetically pleasing, not your typically school drinking fountain (again, for kids that track dirt in just for a drink of water).

Here are a few pictures I found of some great spaces. Tell me what you do for a mudroom?


Saturday, October 30, 2010

Happy Halloween!


Today is Halloween for us! We are having a fun filled day. Trick-or-treating at all the homes in the neighborhood. Family coming over for dinner and treats with a menu including meatballs, tomatoe & basil spread w/ crackers, hot cheese and sausage dip, Jello salad, chips and fresh salsa, treats and drinks. We are going to watch scary movies and play games and hand out candy!

I would love to hear what all of you have planned for Halloween! Leave a comment and tell me what your Halloween traditions are.

Friday, October 29, 2010

Autumn Fun

The Children's Nest had this cute post showing great Halloween or Autumn crafts. Halloween is almost over and we are 4 weeks away from Thanksgiving. Lots to do in between now and then.

Witch Legs
( ARE YOU DYING AT THE CUTENESS HERE!!!!)
Your kids will love this wickedly wild coconut-topped cupcake, with wacky witch's legs made from peppermint sticks.
To make it, follow these steps:
1. Start with frosted store-bought or homemade cupcakes.2. Use black marzipan to make the shape of the witch's boots.3. Stick yellow mini M&Ms on each boot for the buckles with frosting.4. Mold each boot around a peppermint stick to create the legs.5. Top cupcake with coconut dyed with green food coloring.6. Insert the peppermint sticks into the cupcake to create the witch's legs.
SO CUTE AND SIMPLE TO MAKE!!
Bare Bones
These skeleton-inspired cupcakes create a spooky Halloween treat.
To make it, follow these steps:
1. Start with frosted store-bought or homemade cupcakes.2. Place a large candy mint on top of a chocolate frosted cupcake; decorate face with icing.3. Arrange licorice pastels to make arms and legs.4. Place small mints at the bottom of the legs for feet.5. Use white sprinkles to make the skeleton's ribs.
ONE OF MY FAVORITE THINGS!!!

HOW FUN IS THIS??? Not only is it cute for Fall but how cute to do it in bright colors for a birthday party!!!
Dotty Table Runner
With a layer of orange felt beneath, the dotted design on this table runner conjures the image of a field of pumpkins. The chocolate-brown felt top layer will carry you through the harvest season; use black felt for a traditional Halloween look. Trace circles of various sizes onto a length of dark-color felt; cut out. Layer the felt over a length of same-size orange felt. Secure the two layers with glue, if desired, and drape the runner over the table.


HOW FUN ARE THESE GOURDS!!
Suspend a group of gourds on a cord (we used bicolor spoon gourds) from tree branches and watch them dance in the breeze.

Thursday, October 28, 2010

Disney Figurines


There is a good deal for Disney Figurines on Ebay, click here to go directly to the deal. There are a couple different options you could buy:

Mickey Mouse Clubhouse
Little Mermaid
The Night Before Christmas
Snow White & the Seven Dwarfs
Alice in Wonderland
Cars
Handy Manny

So they are only 8.50 + tax (.55) with FREE shipping = $9.05

I double checked that I couldn't get a better deal on Amazon. These were the same price on Amazon, but you couldn't get free shipping.

I'm not sure how long this deal is good for, so if you are considering it I would jump on it.

I bought the Mickey Mouse one for my daughter for Christmas because it's her new favorite cartoon. She just recently figured out that Minnie and Mickey are on her diapers and now every time I change her she points it out. So cute!

Wednesday, October 27, 2010

Project Complete

I decided since I only have 2 days left until Halloween I had to get my Luminaries done. I put both my kids down for bed and went to town. I found pumpkin carving templates on BHG and just used them as a template to cut out of vinyl. I think they turned out pretty cute even though I didn't have orange tissue paper and had to layer red and yellow together for the pumpkin one click here to see the previous post about this project.


Will be way cute lit up on the porch for Halloween weekend!

TrIcK-oR-tReAt Totes!

My 2 year old is finally old enough to go trick or treating and understand the concept. Last year we had to knock on the doors hold her bag for her and hold her. This year she can do all that herself and understand that candy is involved! I think these tote bags are way cute and want to make one for her to have with her costume! Found this on The Sometimes Crafter.

Trick-or-Treat-Bag-Main-Photo

I wanted to have a little bag for Brice for Trick or Treating this year, and I knew I wanted to make it myself. I also knew that I wanted to do something with a pumpkin on linen so I combined the two. I’m not sure when I decided I wanted to do some embroidery, but I started sketching things out and came up with the above design. It’s absolutely fitting as Brice LOVES his “meows”.

IMG_4718

I stared with the cat and added the pumpkin, but kept thinking it needed something else. Hence the tree. But it was no easy matter trying to draw a tree that said “fall” but was still fun and cartoonish like the cat and pumpkin. With my moms advice I finally decided on the tree in the design.

IMG_4877

I found the dots at Joann’s along with the lining fabric some months back. I had thoughts of making them into a trick or treat bag for Brice, but this wasn’t what I was originally thinking, but that’s just fine by me.

IMG_4824

I have had the idea of doing a pumpkin appliqué on a bag since my apple bags. I made it up as I went along, using the sketch from my embroidery for my pattern. As an after thought I decided to embroider on the pumpkin, but knew embroidery for the vine was a perfect choice all along.

IMG_4750

He loves this little bag. He gave it a kiss and a hug and happily caries it around on his arm. It’s just the perfect size for treats and will serve us for many years. Not into Trick or Treating? I think it’s the perfect size for a little library tote, too. Now it’s time to go make one for yourself. The free pattern includes instructions for making the bag as well as the embroidery design and pumpkin appliqué template.

Treat or Treat Tote Pattern (PDF)

Tuesday, October 26, 2010

Old Navy Scream Station

So, MANY, Many,many years ago my mom was listening to the radio and they were giving away like 6 tickets to a haunted house if you called in and screamed as loud as you could (it was like 6:30am). She went into the laundry room and closed the door and screamed as loud as she could and won the tickets and we had a great family outing to a haunted house.

I saw this promotion and totally thought of my mom. Check it out, Old Navy is giving you a coupon if you scream! Screaming for Savings! Just click here, Old Navy

Beware, there is a video on that page and it's a little if'y if you ask me, but you can pause it.

Halloween Table Runner

If I was a sewing kind of girl, which I am going to become because I'm taking sewing classes, I would totally make this for Halloween and all other holidays! I saw this great tutorial on 7Layer Studio


Ribbon Table Runner Tutorial

Runner with 1 ph2 redone


Runner with 1ph4 redone
Due to a large number of requests for an actual tutorial for the Halloween table runner I made last year, I'm doing just that. Yes, you're welcome. :-) Thanks for all your enthusiasm about this project - it has really appealed to a lot of people! It's not a difficult project, but I won't say it's a quick one. Despite its simple appearance, you will need to budget 2 to 4 hours for completion, depending on your experience level.

Strips cut

YOU WILL NEED:

2 yards fabric for main background color (relatively solid color is best)

2/3 yard fabric for border

approx. 12 yards ribbon; assorted sizes, colors, and designs

1/4" double-sided fusible interfacing (approx. 12 yards), such as Steam-A-Seam

Step 1) Cut main fabric into long rectangle measuring 14" x 70". Hint: cut the selvedge edge off one side (the entire length of fabric), then measure 14" from that edge. Make a small 1/2" snip at 14" mark with scissors, then rip fabric all the way down. It will follow the grain of the the fabric and you will rip a long strip 14" all the way down.

To cut border fabric, fold with selvedges together and use a rotary cutting system. Cut 5 strips which are 4" wide each.

Ribbons cut

Step 2) Precut your ribbon. Cut at least 4 of each variety if you're using 6 different ribbons, and more if you're using fewer different kinds. Cut the ribbon at least 16" long, because the length increases when ribbon is placed at an angle. If you want steeply angled ribbon, cut it 18".

NOTE: if your ribbon has stitched thread details, "preshrink" it with a hot steam iron. It will shrink considerably and will pucker your project if you don't preshrink it.

Fusible tape

Step 3) Place main fabric face up on ironing board. Arrange strips of interfacing in random fashion on fabric. Don't take off paper backing yet! Touch a hot iron VERY briefly (as in 1 second) to the paper-backed interfacing to fuse the first side a little, then peel off paper.

NOTE: At this point, don't overlap lines. Do the first layer, lay the ribbon down, then lay down a second series of interfacing + ribbon on top after completing Step 4.

Ribbon fused

Step 4) Arrange ribbon on top of interfacing in desired sequence. Fuse in place according to manufacturer's directions. The super wide ribbon needs 2 strips of interfacing. I like to tuck the second strip of interfacing under and fuse it after doing the first one so that the ribbon doesn't shift. HINT: Don't scoot your iron along ribbon with painted designs on it - the paint could smear under high heat and a wiggly iron.

Repeat steps 3 and 4 if you want overlapping ribbon, such as the orange ribbon and a few of the black ribbons you see in photo below.
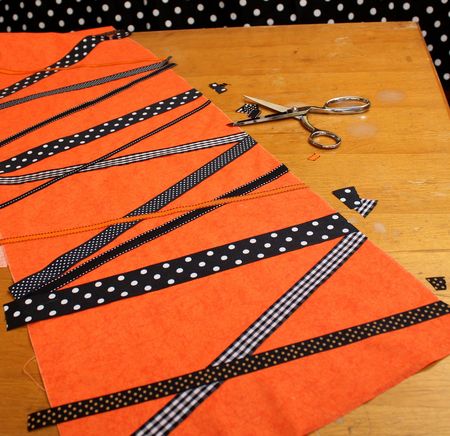
Snip off extra ribbon

Step 5) When all the ribbon is fused as desired, snip off excess ribbon along edges.

Sashes sewn and pressed

Step 6) Prepare the border fabric by stitching 2 strips together at the ends with a 1/4" seam, then pressing strip in half lengthwise with the right sides facing out. Repeat with 2 other strips. The 5th strip just needs to be pressed in same manner but not sewn to anything.

NOTE: There are other ways to sew the border on, such as sewing all the strips together and sewing it all the way around the rectangle with folded "miter" corners, but I didn't use that method in this tutorial. Those of you who know other methods of bordering are (obviously) more than welcome to attach border with alternate approaches.

Pin sash on

Step 7) Pin the 2 long strips to the 2 long edges of rectangle, with the raw edges of border facing outward to meet up with the raw edges of rectangle. You don't have to extend the border fabric beyond the edge of the rectangle as much as the photo shows: I was originally going to do standard miter corners but then changed my mind. Sorry if that confuses you. The ends should extend about 1/4" beyond rectangle for this method of sewing the borders on, not the 4" extensions I have pictured.

Sashes sewn on

Step 8) Using 1/4" seam, stitch long strips to the 2 long edges of rectangle. Serge if desired. Press borders out and press the seams toward center of rectangle.

End sashes cut

Step 9) Clip off extra border fabric on ends of rectangle. Take the 5th border strip and cut it into 2 equal lengths, as shown above.

End sash pinned

Step 10) With raw edge facing outward to meet up with raw edge of rectangle, pin end borders onto ends of rectangle. Center so that equal amounts of extra fabric extend beyond each edge.

Corner folded2

Step 11) Stitch/serge end borders on. Press seams AWAY from rectangle, so they face border. Press extra fabric "tab" over the end border on the backside so that all excess is folded under, as shown in photo below.

Corner folded

Corner tab diagonal

Step 12) Open tab temporarily and press the corner down as shown in photo above. Use a bit of interfacing tape and secure flap.

Corner tab diagonal fused

Step 13) Place 2 more bits of interfacing on open tab as shown. Remove paper backing.

Corner tab finished

Step 14) Fold flap over and fuse well. Repeat on other 3 corners. Give your runner one final pressing and go give some striking bling to your table!

Runner with 1ph3 redone

Monday, October 25, 2010

Pumpkin Recipes

I simply love Pumpkin Goodies! Here's a bunch to make for all those Halloween parties coming up this week. Leave me a comment and tell me which ones you try and which ones are the best!

Chocolate Pumpkin Cupcakes by Good Life Eats


Pumpkin Chocolate Chip Cookies by Two Peas and Their Pod


Pumpkin Waffles by Claire Robinson


Pumpkin Cheesecake by Martha Stewart
I made this one a couple years ago for Thanksgiving and it was SO good, but I Love Pumpkin anything.

This one by good 'ole Paula Deen
Pumpkin Bars

Pumpkin Mousse Parfaits by Barefoot Contessa


Another by Paula Deen

Saturday, October 23, 2010

Box of Goodies

I do not have kids that go to school yet so I would not be able to make this for a school teacher, but I love this idea for Christmas gifts or Shower gifts too. I thought this would be cute done up to be almost like a jewelry box and give it with a couple pairs of earrings inside. I love the idea of all the push pins, and tiny knick knacks. I would love this to be in my junk drawer so I could be way organized. How about for all those scrapbooking embellishments and stickers. The people and eighteen25 thought up this beauty.

It also looks way cheap to assemble and not hard at all. Love that kind of project.

so grab yourself one of these boxes.
sold at most crafts stores... and even wally world.
you'll find them down the aisle with all the pretty beads.

take a piece of computer paper and trace around the top piece of the box.

cut it out. now you have a pattern.

next take some ribbon. wrap it around your box. make sure you have plenty to make a bow.

go through your scrapbook paper stash and find 3 coordinating papers.
or head to your closest scrapbook store and pick up some of this adorable paper by my mind's eye.

using your pattern. cut out a top piece out of one paper and a bottom piece out of another.

then cut about a 1/2 inch strip of your third paper.
glue all three pieces on to your box.
using some stickers. write out the lucky teacher's name.
and then finish it off with a die cut or something.
(this little birdie is from my mind's eye also)


once you have the outside decorated it's time to fill up the inside with fun stuff.
sanitizer, push pins, paper clips, magnets and CHOCOLATE!
(i found all of it at walmart except for the hand sanitizer i picked up at bath &body works)


and even though we're still a little upset mrs. olson decided to have a healthy teeth party on
valentine's day... we still appreciate all she does!! :)

Related Posts Plugin for WordPress, Blogger...